Quick Start Guide
Below is a Quick Start Overview on how to login and make changes to your website.
Contents
[hide]How to Login
When you are viewing any page of your website, move your cursor over the upper right corner of your web page and click on the Login/Register icon when it appears.
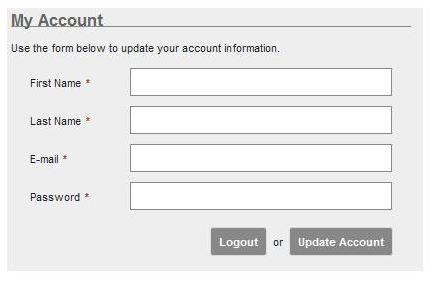
Enter your username and password in the boxes and then click the Login button. While you are logged in the Account button will be available in the top right corner of your screen. Click on this button to display the screen below.
This box will display your first name, last name, email (user name) and password. You can update any of these fields by clicking in the box, changing the information and clicking on UPDATE ACCOUNT. You also have the option of logging out by clicking on the LOGOUT button.
How to Edit Text on a Page
When you are logged on as an Administrator, you will select the EDIT option from the menu at the top of your web page.
Next, click on the paper/pencil icon for the text box that you want to edit. This will take you to a record that allows you to edit the copy on the page. Simply click in the “Copy” box and replace existing text with your new text. Click OK to save your changes. When you are done editing, you can click on the EDIT button again to leave the edit mode.
How to Add Pictures to a Page
To add a picture, click on the paper/pencil icon for the page where you want to add the picture. Put your cursor in the text box and click on the image icon near the center of the toolbar. This will open a window where you will be given the option to select the image you want to place on the page. Click on the file folder next to the Source field. This opens another window where you will add the picture file at the bottom of the page. Click the CHOOSE FILE button in the Add Files text box. This allows you to search your computer for the picture you want to add. When you see a list of files on your computer, click on the file you want to upload and then click OPEN. When the file name appears in the text box next to CHOOSE FILE on your website, click the APPLY button and then the INSERT button on the preceding screen, where the source file is listed.
You will then see the file in a list and you should click on the icon in the Place column to add the picture to your web page. After you make changes, click OK to save your edits.
How to Edit a Menu
Click on the paper/pencil icon for the menu that you want to edit. This will take you to a record that allows you to edit the menu name. After you make changes, click OK to save your edits.
How to Add New Menu Sections
To add new choices to your menu, click on the + next to the current menu. This will take you to a record that allows you to add a menu name and an alpha sort order. If you already have menu sections with an a, b and c, make sure you put d as the sort order for your new menu entry. After you add a new menu section, click OK to save it.
How to Add Sub-Menus
To add new choices as categories underneath a menu item, click on the menu item. This will take you to the page for that item choice.
At the bottom of the text, click on the +, which will take you to a record where you can add a sub-menu Name, which will appear underneath the main menu item as a choice and a Headline, which will be the title for the copy on the page for that sub-menu. After you add a sub-menu, click OK to save it.
How to Delete Items
To delete menu choices click on the paper/pencil icon next to the menu item you wish to delete. When the menu record opens, click on DELETE RECORD. To delete text boxes from a page, click on the paper/pencil icon next to the text box you wish to delete. When the text record opens, click on DELETE PAGE to delete that item.
