American College of Nurse-Midwives (ACNM)
This website can be accessed at http://acnm.org/
Contents
Clear Cache Tool
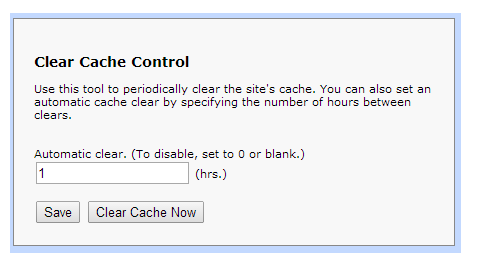
In order to clear the cache on the ACNM site, administrators or content editors can login and click on ADMIN. Next, click on MANAGE ADD-ONS, ACNM and then ACNM CLEAR CACHE CONTROL. You will then see the following screen:
You can choose to hit the CLEAR CACHE NOW button to immediately clear the cache. You can also change the number of hours in the box to set how often you want the cache to automatically clear. Click on SAVE if you choose to change the number.
How to Manage Third-Party Add Search Bar
login to Add Search
Username: webmanager@acnm.org
Password: Midwife99#
The addon, Addsearch, says that they will automatically recrawl the website when they think it is fit to do so.
- You may get to these recrawling tools from the tab "Index Tools". Once there, enter the URL for the page you want to update, in this case it was https://www.midwife.org/national-midwifery-week,
- Then hit "check status", that will expand a screen and there is "recrawl url" button. This will update the results for that one page and it is fast and it seems like it can be done an unlimited amount of times.
- There is also a "Full Recrawl" button. This will update all the search results for every page across the site and take about an hour. It can also only be run once a week.
Page Templates
To set a template for a webpage, go to the webpage, login and click on EDIT. Then click the paper/pencil icon for the page content record. Click on the FEATURES tab and in the TEMPLATE field, choose the template you wish to use from the drop down menu.
To see the templates that have been developed for ACNM: Login and click ADMIN>MANAGE DESIGN>TEMPLATES
ACNM Pledge Campaigns
The pledge form add-on enables you to place a pledge on a page with a form for people to sign the pledge by entering their name, email, state, and zip code. They may also choose to receive periodic updates from ACNM.
How to Install the Pledge Form Add-On
Click here for information on Installing Add-Ons. (The Add-On is named PLEDGE FORM.)
How to Add the Pledge Form to a web page
When you are on the web page where you would like the pledge form to appear and are logged on as an Administrator, you will select the EDIT option from the menu. Next, click the paper/pencil icon. This will take you to the Edit record for your page. On this screen put your cursor in the Copy box, click on the Add-on drop down menu and select Pledge Form. An image with the Contensive logo will appear in the Copy Box. Click OK at the top of the page to save the pledge form to your webpage.
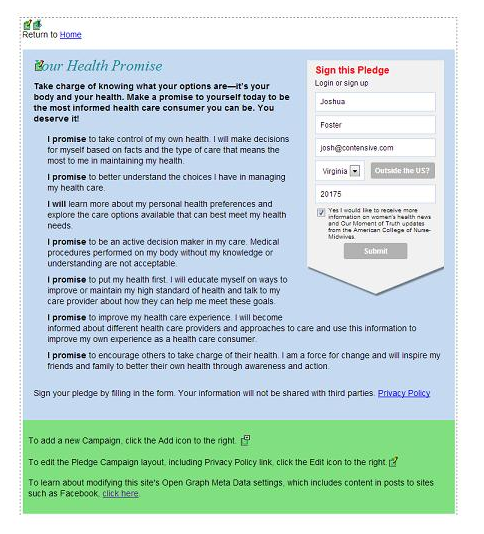
After you click OK, you will return to the webpage with the pledge form, where you will see the following:
Click on the paper/pencil icon by the pledge name to edit the pledge text or to select the group for people who signed the form and also for people who chose to receive additional information. All fields are required to submit the form. The field “State” is a drop down of the US states; if the user clicks the link “Outside the US” the drop down provides a list of countries and the link changes to “Inside the US”. The “Privacy Policy" link goes to a content page containing the OMT privacy policy.
Once the user clicks SUBMIT, a system email is sent to the “pledger” . You can edit the content of this email by logging in and going to ADMIN. Then click on MANAGE EMAIL, SYSTEM EMAIL, and then the paper/pencil icon for PLEDGE CAMPAIGN AUTO RESPONDER. You can edit the email text, subject, from address, notification send to address, and groups to receive the email. Click OK to save changes.
When someone fills out the The Pledge form and clicks SUBMIT, the information collected is saved to fields in a people record and adds that user to the group specified in the CAMPAIGN RECORD. Next, a light box pops up to ask the user to share their pledge on Facebook, Twitter or email. The Facebook incorporated Open Graph tags to allow a graphical post of the pledge on the user’s timeline. The Facebook and Twitter links will use the following information:
- The Link will be the URL or the page where the Pledge form is placed.
- The title and the description for the Facebook share will come from what you enter in the "Meta Content" tab for the page where the Pledge form is placed.
To change the campaign on a page, login and click on ADVANCED EDIT. Click on the WRENCH above the campaign name and choose the new campaign from the drop down in the CAMPAIGN field. Click UPDATE to save changes.
ACNM Library Search
The ACNM Library Search provides the ability to drop a search on a webpage for specific files for a specified combination of keyword, topic and/or category. To show up in the search, there must be a record saved in the ACNM Library2 Files. The files that will appear first in search results are those with keywords specified within the birth tool files and with the keyword in the title of the document. After those documents, any other documents with the search word in the content of the document will be displayed.
To place the Library Search on a web page, go to the page, login and click edit. While editing the page, put your cursor in the copy box and select ACNM LIBRARY2 FILE SEARCH from the Add-On drop down menu. Click OK to save changes.
When you first place this add-on on a webpage, on the screen the user can type in a keyword and if they want they can choose a specific Category or Topic to narrow results.
Adding Files to the Library Search Results
In order to show up in the search results, the file must be added to the ACNM Library2 Files. You get to these files by logging in, clicking on ADMIN and then on ACNM LIBRARY2 FILE SEARCH and finally ACNM LIBRARY2 FILES. This will display a list of all documents currently included in the search. To edit one of them, click the paper/pencil icon next to the file name. To add a new file, click ADD.
You will then specify the name of the file. You can include a URL for a specific webpage to be included in the search or upload a file for a document that you want to include. When you upload a PDF file (after saving), the system will update the content of the record with the text from the pdf file within 1 minute.
Next enter a description for the file, which will show up in the search results screen.
Click on the META tab to select the Category, File Type and Topic for the document. Also, enter the keywords relevant to this document on this screen.
Click OK when you are done to save changes.
To add or edit the categories, file types or documents included in the drop down menus, login, click on ADMIN and then on ACNM LIBRARY2 FILE SEARCH. You will then click on one of the following, depending which item you want to edit: ACNM LIBRARY2 FILE CATEGORIES, ACNM LIBRARY2 FILE TOPICS, or ACNM LIBRARY2 FILE TYPES. To edit one of them, click the paper/pencil icon next to the file name. To add a new item, click ADD. You will then enter the name of the new category, topic or file type and click OK to save changes.

